Friday, 16 December 2011

PolkaDot Lighthouse guest post on Taffeta Ramblings

Olga and I must be heading for some kind of record with the number of posts we've been doing lately so to avoid any over-exhaustion on your part or ours, we'll keep this short and sweet. We just wanted to let you know there's a guest post over on Taffeta Ramblings by PolkaDot Lighthouse - our very first, and let's hope there will be more to come!

And because a post isn't complete without pictures, here's a sneak peek at my Christmas wishlist, which is part of the guest post:

For all the details, hop on over to Taffeta Ramblings.

Carla

Thursday, 15 December 2011

The 12 Days of Craftmas {4}: paint-dipping and spray-painting

Following on from the dip-dyeing theme we talked about last month for cutlery, we thought we would make our next tutorial about dipping other items into paint or spray-painting them to create nice effects. Maybe you like to collect bric-a-brac items from charity shops or eBay and you'd like to know how to spruce them up and give them more of a modern edge to make a unique gift for someone. Look no further...these ideas we stumbled upon from A Daily Something are goodies :)

You will need:
- An object to dip
- Water-based acrylic paint (or oil based paint might work better)
- A clothespin
- String
- Container


1. Place paint into a plastic container that is a bit larger than the object you are dipping.
2. With the clothespin attached to the object, use it as a handle to lower the object into the paint. You could create a horizontal or diagonal line of paint depending on your preference.
3. Finally, hang your object (using the clothespin again) from a string to dry. Place a container underneath it to catch any drips.

...And yet another idea from the talented Rebecca is this spray-painted tray. All you need for this is a tray (or other object), some gold spray-paint and some masking tape to mark off the areas to spray. It looks great and would also be super fast to make.


Alternatively, you could use the above spray-painting technique on a leather clutch bag as seen on I spy DIY:


We hope you like these ideas!
Carla

Wednesday, 14 December 2011

The 12 Days of Craftmas {3}: sweet garland

Today's installment is a delicious edible garland that can be enjoyed by children and adults alike. It's incredibly easy to make and also looks fun and pretty. If you like the idea, we hope you'll give it a go yourselves!

You will need:

- Jute string (in my case, red)
- Biscuits with a hole in
- Candy canes
- A couple of drawing pins


1. Make the Christmas biscuits following your usual recipe but remember to make a small hole at the top of them using a Bic pen or a straw before you bake them. If it's already too late to get your rolling pin out, you can buy lovely biscuits in Ikea that they sell for hanging on the tree which are the ones we have used this time.


2. Once they are ready, thread them by making a small knot around each biscuit and make sure to space them out equally along the string. It's almost ready!


3. Finally, hang it on your wall and then hook the candy canes between each set of biscuits.


Could it be any easier? Warning: the smell of biscuits will invade your living room and will make it difficult to keep the garland up until Christmas ;).

We hope you like it.

See you tomorrow!

Olga

Tuesday, 13 December 2011

The 12 Days of Craftmas {2}: snow globes

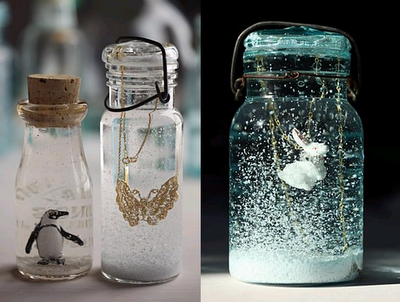
As promised, here is our very exciting second DIY Christmas gift idea. The first time I saw a DIY tutorial for snow globes was on Michaela Noelle Designs. I thought it was a great idea and one worth sharing. Since then, I've seen a few other tutorials and variations on the theme so this post will include my two favourites. To make one, you will need:
  • a jar
  • a Christmas tree/other plastic object
  • a glue gun
  • glycerin to make the snow fall slowly through the water (available at chemists)
  • distilled water
  • fake snow (glitter/dessicated coconut)

1. Glue your figurine to the inside of the lid and leave it to dry completely.

2. Add your fake snow to the jar, then fill it with distilled water (boiled then cooled water) and a few drops of glycerine.

3. Close the lid tightly, adding a little more glue around the border to seal it well and ensure that no water can get out.

4. All you have to do now is shake it and enjoy the snow!

You can find the full tutorial here on Michaela Noelle Designs. The instructions are very clear with plenty of photos to help you along the way. If you prefer to watch a video to find out how to make a snow globe, I found this one by Jordan Reid very helpful.

Still looking for inspiration? Take a look at these Anthropologie snow globes (via The Chiconomist).


The penguin one is a definite favourite!

What do you think? Easy peasy?

Carla

Friday, 9 December 2011

The 12 Days of Craftmas {1}: mittens

Every year, I decide months in advance that I will make interesting Christmas gifts for people. I always plan to be really organised (after leaving it too late the previous year) and then suddenly time vanishes and I realise I've got plenty of ideas but haven't actually made anything yet and it's only a few weeks to go till Christmas...and there are parties to go to, people to see, a house to decorate and mince pies to eat in between. In a bid to break this cycle, we are going to do a series of 12 posts on Christmas gifts you can make yourself (hopefully in time for Christmas) and we'll try to add one or two of our own projects to the mix. Fingers crossed this will help us start crafting and give you some inspiration too. There's no time like the present (geddit?) so let's kick off the series with this lovely tutorial from Etsy.


Visit this Etsy page for a nice breakdown of the instructions. It's fairly self-explanatory, just find an old and pretty jumper then trace your hand and stitch! If you wanted to, you could even find some nice fleecy material to line them and make them extra warm.


How are you at getting organised with these sorts of things? Have you got plans to make anything? Let us know where you found your inspiration or share your ideas with us and we might even include it in this series of posts. We've got a really nice tutorial planned for the next post in the series so stay tuned!

Have a nice and crafty weekend :)

Carla

Wednesday, 7 December 2011

How to make your gifts more special (than they already are)

I'm sure that many of you have already dusted off your Christmas decorations and made the most of your weekend to give your homes a seasonal make-over. I'm still working on it because I don't like to rush things and although I don't have a Christmas tree, I do like filling the house with special details for this time of year: fairy lights, garlands, hangings, candles, sweets...And since there's no Christmas without gifts, today we'd like to show you a selection of free printables to make your gift wrapping outshine even the lights on the tree.
Reindeer gift tags from Eat, Drink, Chic that you can download here.


To decorate your Christmas treats, download these tags from Bake it Pretty. 
Christmas doesn't just have to be about mince pies :)

Another set of my favourite tags from Haciendo el indio in a beautiful range of colours.
 These lovely designs can be found on Design* Sponge if you're looking for more of a vintage feel. You can print them on sticker paper to make excellent stickers.


And lastly, this delightful set from Fellowfellow, featuring nice wee bows that I love. 

We hope you like them and that they give you some ideas. We already talked about handmade gifts the other day - don't you think these tags would just be the cherry on top?

Olga

Friday, 2 December 2011

Same, same but different: woollen jumpers


So it would seem that I skipped a month with the “Same, Same” feature – apologies! I think the excitement of the Handpicked Media event took over and made me forget about my blogging duties for a second. Hopefully I can make this post a good one to make up for that slight glitch in the programme.

Maybe it’s because it’s getting a lot colder outside or because I’ve started watching The Killing and I’m enjoying Sarah Lund's wardrobe but I’ve got a bit of an obsession with woollen jumpers at the moment. Have you? I’m still on the lookout for a nice cosy one but here are a few I’ve stumbled upon recently.


I’m still looking for this Topshop jumper, which seems to have sold out fast. I first spotted it on Taffeta Ramblings – a blog well worth checking out.


Although I’ve not reached season two yet, I do like this red jumper that Sarah Lund wears.

And here’s how they worked wool in the 70’s (a little fuzzy but that's all part of the charm).


Have you got any recommendations for nice jumpers? If you do, please share!
 

Hope you have a warm and fun weekend planned!

Carla
Related Posts Plugin for WordPress, Blogger...